


Proper wheel torque sequence is critical for installation and to ensure safety on the road. Wouldn’t it be helpful to have a go-to reference guide and ensure you do it once and do it right? Below is an Alcoa Wheels expert-driven, step-by step of instructions and key information to consider when installing your wheels:
HOW-TO: PRE-TORQUE PREPARATION
Clean all mating surfaces:
1. Clean the hub or drum.
2. Clean the wheels.
3. Alignment sleeve.
This is an optional step that can help both center the wheels and protect the studs. You want to make sure everything is aligned when installing the wheels Alcoa® Wheels’ genuine E-Z Mount Wheel Alignment Sleeves were designed to support the wheel mounting process and assist in lining up wheel end components for ease of installation. They may also help seat a brake drum.
4. Install wheels over sleeves. to help protect the studs.
5. Lubricate the nuts.
Add 1-2 drops of oil directly on to the stud. Also add 1-2 drops of oil between the nut and the free spinning washer.
6. Install the lug nuts hand tight. Bump the lug nuts on.
Starting at the top (12 o’clock), then the bottom (6 o’clock), then crisscross pattern until complete. To achieve proper torque, you need to use a calibrated torque wrench at the proper torque level. The lug nut should move at least a quarter turn before you arrive at final torque.
What is the difference between re-torquing and torque checks?
Ball seat wheels were prevalent for many years and had to be re-torqued because of their inner and outer cap nuts and right-handed/left-handed threads, depending on what side of the truck you were on. Therefore, the recommendation was to loosen every other cap nut and re-torque the inner cap nut. Following this step, it was advised to loosen the other five cap nuts, re-torque the inner and retorque the outer. This became the actual re-torque process, which was extremely time-consuming.
When the industry transitioned to hub piloted wheels, there was no longer a need to have to un-torque and re-torque. Therefore, we now refer to that as torque checks because you’re not re-torquing. You are just checking the torque. If it’s a check, we’re not trying to add anything to it. We are just trying to ensure that it is still within the proper range so that we know that everything was Initiated and completed properly.
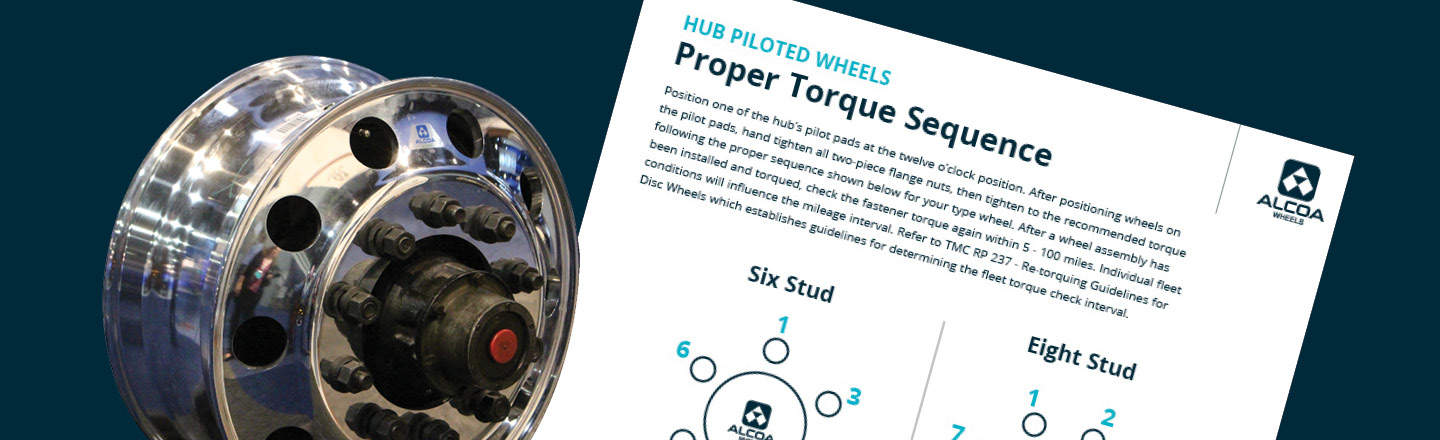
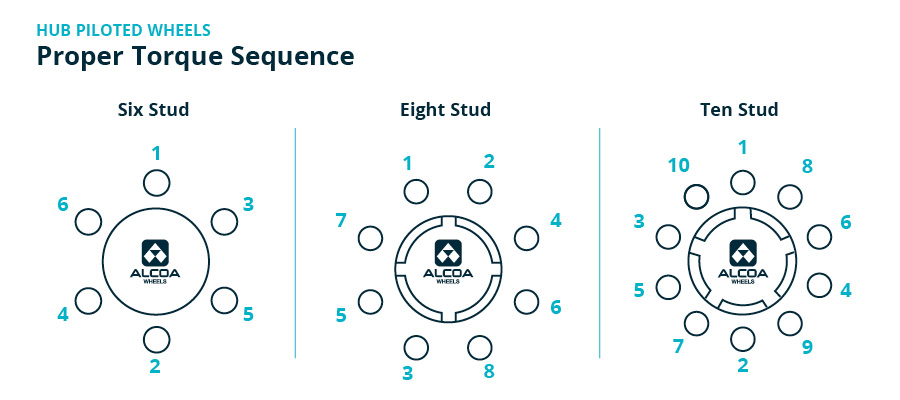
HOW TO: PROPER TORQUE SEQUENCE
Position one of the hub’s pilot pads at the twelve o’clock position. After positioning wheels on the pilot pads, hand tighten all two-piece flange nuts. Next, tighten to the recommended torque following the proper sequence shown below for your wheel type. After a wheel assembly has been installed and torqued, check the fastener torque again within 5 – 100 miles. Individual fleet conditions will influence the mileage interval. Refer to TMC RP 237 – Re-torquing Guidelines for Disc Wheels which establishes guidelines for determining the fleet torque check interval.
HOW TO: MORE TORQUE TIPS
Type of torque wrenches.
The dowel indicator type torque wrenches help indicate if there is movement while the clicker type torque wrenches will not indicate if there is movement. Breakaway torque wrenches work similarly to the clicker torque wrenches.
The right methods and numbers.
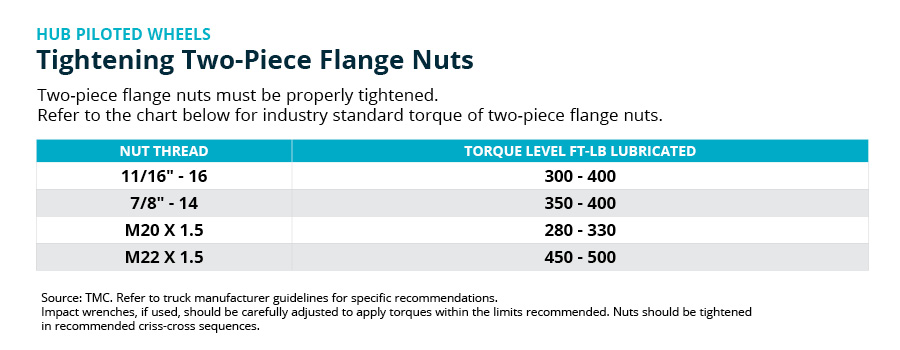
The “good enough, tight enough method” is NOT recommended. Setting the torque wrench guns to the highest setting is going to damage the fasteners. Therefore, do not exceed 500 pounds torque. The correct method is to hand tighten the two-piece flange nuts, then tighten to the recommended torque with a (calibrated torque wrench). The lug nut MUST move 1/4 turn before arriving at final torque. Using 1” guns risk over-torquing. Over-torquing is just as damaging as under-torquing.
Test drive.
Following the wheel installation, a 5-mile test drive is recommended. You want to see what you need to do to get a little movement in that joint and if there is, in fact, any movement there. If done right, there will not be any movement, and all is ready to roll.
Process control.
Be sure to keep on hand the documentation that states you checked the torque. This will ensure process control and provide any regulatory questions that may arise.
Certified technicians.
When in need of maintenance, note if technicians have their Tire and Rim Association (TRA), Tire Industry Association (TIA) certifications, which guarantees they are properly trained.
MORE RESOURCES
To hear more from Alcoa® Wheels experts on torquing, check out our Behind the Wheels podcast episode, It’s All About the Torque.